INSTALLATION GUIDES
Who can install the in-ground trampoline for me?
We have experienced installers in these areas who can come and give you an no obligation quote.
IN-GROUND
DUBBO REGION - NSW
McNamara Landscaping and Softfall
Scott McNamara
Ph 0429 404 294
HUNTER VALLEY REGION - NSW
1800Mr Excavate
Craig
Ph: 1800 673 922
SYDNEY SOUTH & ILLAWARRA REGION - NSW
McMahons Earthworks
Austin McMahon
Ph: 0434 276 356
GOLD COAST - QLD
Gold Coast Landscapes
Brett Taylor
Ph 0402 458 727
BALLARAT - VIC
Hewy landscapes
Hewy
Ph: 0400 842 978
GEELONG - VIC
Mark Rowlands
Ph: 0411 193 605
GOULBURN VALLEY REGION - SHEPPARTON/NAGAMBIE - VIC
JB Mini Digging
Jordy Baker
Ph: 0419 423 312
MELBOURNE & MORNINGTON PENINSULA - VIC
SE Mini Hire
Cameron Smith
Ph: 0423 693 569
MELBOURNE & MORNINGTON PENINSULA - VIC
Upgraded Concrete & Excavations
Jackson Rowley
Ph: 0400 726 009
BUNBURY - WA
J&J mini diggers
James
Ph: 0434 591 740
PERTH - WA
Melvin
Ph: 0438 458 866
PERTH - WA
Sam Wiles
Ph: 0492 360 256
PERTH - WA
Able Excavator Service
Jim Watkins
Ph: 0409 775 406
ADELAIDE - SA
Visual Landscape Gardening
Alby
Ph: 0417 863 159
TASMANINA - DEVONPORT REGION - TAS
Vanscapes
Jack Vanderfeen
Ph: 0400 688 024
Otherwise contact your local landscape gardener and download our In-Ground Installation Manual to show to them.
Please Note: While Oz Trampolines recommends these installers, Oz Trampolines in no way is liable for the work of these companies and receives no commission.
ABOVE GROUND
To install the trampoline will take you approximately 2 hours or you can contact one of our experienced installers who can advise you of a price.
GEELONG
Craig
Ph: 0418 384 258
MELBOURNE
Bryce
Ph: 0435 370 788
MELBOURNE NORTH
John Rayner
Ph: 0435 653 854
SYDNEY
Aus Trampoline Services
Ph: 0416 940 271
BRISBANE & GOLD COAST
Gary & Sue Wilson
Ph: 0413 859 562
SUNSHINE COAST
Brad
Ph: 0418 369 759
ADELAIDE
Assembly Experts
Baz
Ph: 0406 464 889
ADELAIDE
Marcus
Ph: 0472 636 581
Other Areas
Leisuretek
Ph: 02 9836 2600
Click here to download our Summit Round Installation Manual.
IN-GROUND tRAMPOLINE INSTALLATION GUIDE
STEP 1
DIG THE HOLE

Mark out a hole that is a few inches wider in diameter than your trampoline. This is to give you a little extra room when you place the trampoline in the hole.
Dig out 25cm of soil evenly across the entire hole. Then dig an inner hole in the middle that is 2ft or 60cm less in diameter than the trampoline size in a bowl shape to a depth of 90cm(about 3ft) for 12ft and 14ft trampolines and 75cm (about 2ft 6 inches) for 8ft and 10ft trampolines. This will leave a ledge onto which the trampoline frame will sit.
TOP TIP
It's hard to be precise with the hole measurement - the extra few inches will make it easier for you. This extra space will be back-filled at the end. Keep some of your excavated top soil close by the hole for back filling.
HOW DEEP TO DIG THE HOLE?

| TYPE | TRAMPOLINE SIZE/OUTER HOLE DIAMETER | INNER HOLE DIAMETER | HOLE DEPTH |
| ROUND | 8ft (2.44m) | 6ft (2.04m) | 75cm |
| 10ft (3.00m) | 8ft (2.60m) | 75cm | |
| 12ft (3.65m) | 10ft (3.25m) | 90cm | |
| 14ft (3.65m) | 14ft (3.86m) | 90cm | |
| RECTANGULAR | 10ft x 6ft (3.00m x 1.85m) | 2.60m x 1.45m | 75cm |
| 11ft x 8ft (3.35m x 2.45m) | 2.95m x 2.05m | 75cm | |
| 14ft x 10ft (4.25m x 3.00m) | 3.85m x 2.60m | 90cm |
STEP 2
Assemble the frame

Assemble the top and bottom sections of the trampoline frame, attach mat and springs and fix the retaining wall to the outside of the frame.
Attach springs at 12 o'clock position, then 6 o'clock followed by 3 o'clock and 9 o'clock first - this will give even tension and make it easier to fit the rest. For rectangular trampolines start with the corners first.
STEP 3
SITE TRAMPOLINE INTO THE HOLE

Lift the trampoline into the hole and place on the ledge ensuring the frame is at the correct height. Then back-fill in the gap on the outside of the frame, compact the soil and re-turf.
STEP 4
ATTACH THE VENTED PADS
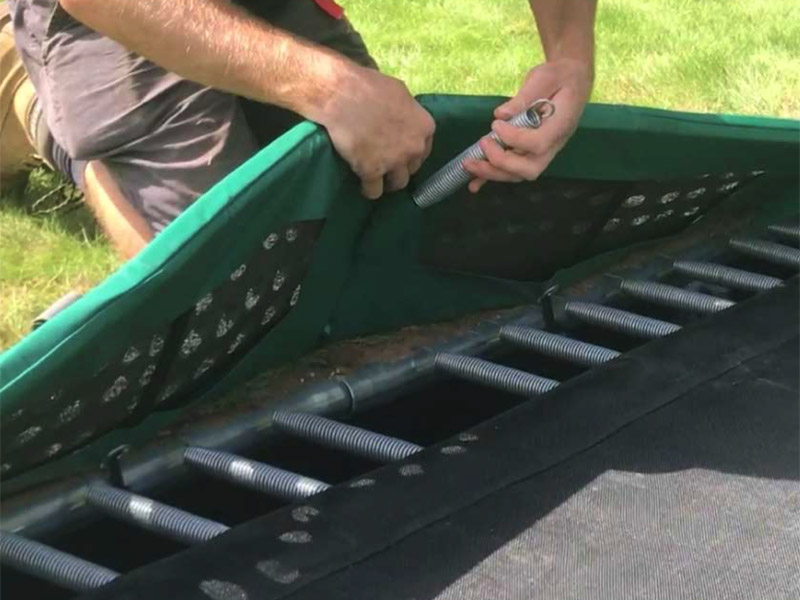
Use a long screwdriver to help push the elasticated toggles down between the trampoline frame and the retaining wall in order to secure the pads to the trampoline.
Attach the vented pads to the frame & you're ready to enjoy your In-Ground Trampoline!
Your trampoline is complete!
Will my trampoline need drainage?

Some customers are concerned that water might sit in the bottom of the hole for their in-ground trampoline. The simple truth is that 99% of our customers have no problem with water – though water may sit in the bottom of any hole after heavy rain, it will soon drain away. The only exception to this is customers who have non` porous soil such as clay, as the water will drain much more slowly.
Building a soakaway
A soakaway is a ‘pit’ filled with a combination of stone, rocks or broken brick and helps any rainwater drain away. At the bottom of the hole that you dig for the trampoline, dig a small pit approximately 600 x 600 x 600 and fill the bottom of it with bigger bits of brick or stone, and the top with smaller rocks.
Wait and see...
The other option is to wait and see if you actually have a problem. It's easy to access the hole after you've installed the trampoline, just remove the surround pads & jump mat. All of the options described below can be done retrospectively, so it's often best to 'wait and see'.
OTHER DRAIN SOLUTIONS

The Simple 'As and When' Pump Solution
All you do here is to use a simple surface drainage pump to pump water out of the trampoline as and when you need to e.g. when the hole fills up with water after heavy rain. Take a portable pump connect power to the pump, put the inflow hose into the trampoline hole and take the outflow hose to another area in the garden and switch on.

The Permanent Pump Solution
The idea here is that you put a 'submersible' pump into the bottom of your hole and connect to a permanent electrical feed. You will need to dig a trench for the cable and outlet hose (see top picture).
You can activate the connection either by using a switch in your shed or house (wherever you've taken the cable to) or by using a float switch. (pictured) This makes a connection as the water level rises and moves the float switch into a vertical position which activates the connection.

The Drain Pipe Solution
This is only possible if you can take a 4 inch drain pipe from the bottom of the hole to a lower area in the garden e.g. into a ditch. This is a very good solution and works really well. It's easy to install the drain (see below) and is not expensive - it will give you peace of mind & no need for any electrics.
FREQUENTLY ASKED QUESTIONS
Our trampolines have been designed to install yourself, how long it takes depends on the size of trampoline you choose and whether you dig by hand or hire an excavator. Digging by hand we'd say allow a weekend to complete the job, if you hire an excavator you'll easily do it in a day.
No! Our in-ground trampoline kit has a retaining wall built in, making it even easier to install at home. The retaining wall easily screws onto the frame into pre-drilled holes.
This depends on the size of trampoline you choose and how energetic you're feeling! We'd recommend digging the 8ft and 10ft sizes by hand as it's actually easier to get the bowl shape you need with a spade than an excavator. But for the largest sizes hiring an excavator will definitely make less work for you.
The amount of soil you need to excavate will vary depending on which size trampoline you are installing. For the smaller & medium size trampolines you will fill a regular sized trailer. For the larger trampolines you may need to do two trailer loads to collect the soil. If you are able to use the soil in your garden for raised beds or levelling ground etc. then you will save the cost of a trailer.
In most cases, a simple soak away as described in the instructions should be sufficient to ensure your trampoline pit drains well. For some gardens that have a high density of clay you may need to consider alternative drainage options such as the ones outlined in our blog.
If you do not have a net on your trampoline then you should leave at least 1.5m around the perimeter of the trampoline to avoid the user bouncing off the trampoline into a potential hazard such as a tree or fence. You should also make sure that there are no hard surfaces within this area such as a stone pathway.
Fortunately, the Capital In-ground Trampolines are relatively maintenance free! It always helps to prolong the life of your trampoline pads and jump mat if you purchase a cover. Likewise keeping your trampoline clean of general garden debris such as fallen leaves, twigs and mud will help maintain all elements of the trampoline. We recommend that you check all parts regularly and replace any worn out parts as soon as you notice them.